Thursday, November 5, 2015

Bears in a Cave

Hi everyone! I wanted to share with you one of mine and my kinders favorite math activites! It is called Bears in a Cave!!! Right now I am so happy with my November math work stations in my classroom and so are my kiddos, so I just had to share!

Bears in a Cave is a interactive and fun math activity! Students must "hide" bears in the cave and their partner must guess how many are inside and how many are outside of the cave. There are recording sheets for students to show their work. You may use counting bears or the bears that I have provided. Also, you may use a plastic bowl for the cave or the "cave mat" provided

Here is a picture of one of my kinders playing!

You can find this activity and lots others at my TPT store. Click here!

Sunday, August 2, 2015

Sight Words Book

Hi everyone! I hope y'all are enjoying this exciting back to school time! I love this time of year because my Instagram, Facebook and Pinterest feeds are all a buzz with exciting new ideas.

I don't know about y'all but I'm always searching for ways to make learning sight words fun, and I am always in search of new ideas to get the kids to want to learn their words! The best thing that has worked for my kinders and their parents are my sight words mini books.

Our entire school year's worth of words are in this mini book. It measures 4X6 inches and has a card stock cover bound by a binder ring. The kids love checking off each word as they master it. I even included a note to parents explaining what sight words are and why they are important for kids to know them in a "snap."  I've gotten a great response from my parents from these books each year. They like the ease and functionality of the little book and being able to move ahead with the words if their kiddos are ready.

This year, I might try placing stickers on the checked off boxes to add even more of an incentive for my kinders. Why do you think?

Find these useful mini books along with the parent letter and assessment form at my store here.


Sunday, July 26, 2015

Monthly Resources

Hi everyone! It has been a while- I am truly going to start trying to blog more! Now that I've gotten my guilty confession out of the way let's get started! I don't know about y'all but I have a love-hate relationship with my filing cabinet. I love how all of my files are organized by theme/subject and everything can be packed away to save space, but hate how jam packed full the thing is! I can barely reach my hand in there and I most definitely can't see any of my papers!

Luckily, I stumbled across We Heart First's brilliant idea of Monthly Resource Binders find them here. I decided I needed a change! I made it my summer goal to transfer all of my files from my filing cabinet into Monthly Resource Binders. Here's how it turned out...


I decided it would be best to store these cute and useful binders in a crate in my room along with other resource binders. I used 1 1/2 inch binders from Walmart. These crates are also a space saver!

Here's what the printable covers look like. Are they adorable or what?!?! You can download the covers and spines from WeHeart1st!


I put in sight words, assessments, print outs, and activities for that month. I punched holes in Ziploc bags to keep activities organized.  


I even put a copy of books that I know I will use during that month. Here is a copy of The Kissing Hand- I always read it on the first day of school. I also made these signs for Meet the Teacher Day so the parents will easily know what to do. Visit my TPT store to get your copy of these adorable signs to put out for Meet The Teacher Day 


Here is a checklist of procedures to teach the kids during the first week that I stuck in there! A must!


Well, I hope getting a look inside my monthly binders gives you some helpful organizational tips! Please visit WeHeart1st here for the binder covers/spines 


Saturday, November 29, 2014

Flower Magnets

During the school day I am constantly searching for magnets to hang things on my whiteboard. I don't have much wall space in my classroom, so I have to put a lot of anchor charts on my board and change them throughout the day.

When I went to the store to go buy some hanging magnets, I remembered that I saw some adorable flower magnets a while ago on Pinterest. These made the whiteboard look like a beautiful flower garden! It's the little things that make you happy, and each time I look at these I can't help but smile!

Here's what to do:
 1. Buy plain magnet discs. These can be found at a variety of places.
 2. Flower Embellishments- I used Prima Flowers. These are absolutely gorgeous. They are used in scrapbooks, but I have used them for so many different projects. They can be a little pricey, but with your craft store coupon they are completely worth it. I've had this large jar forever.  
 3. Now you are ready for the fun part! These flowers are meant to be layered, so start putting together different combinations. I usually layer three at a time- a small medium, and large. Place a dab of hot glue on the center of each flower- a dot will do! Then glue your whole flowers to the magnets.
 And that's it! The easiest way to add a little special something to your classroom!
 What you'll need:
*magnet discs
*flower embellishments
*hot glue gun

Look at that gorgeous flower garden!

Friday, November 28, 2014

Crate Seats

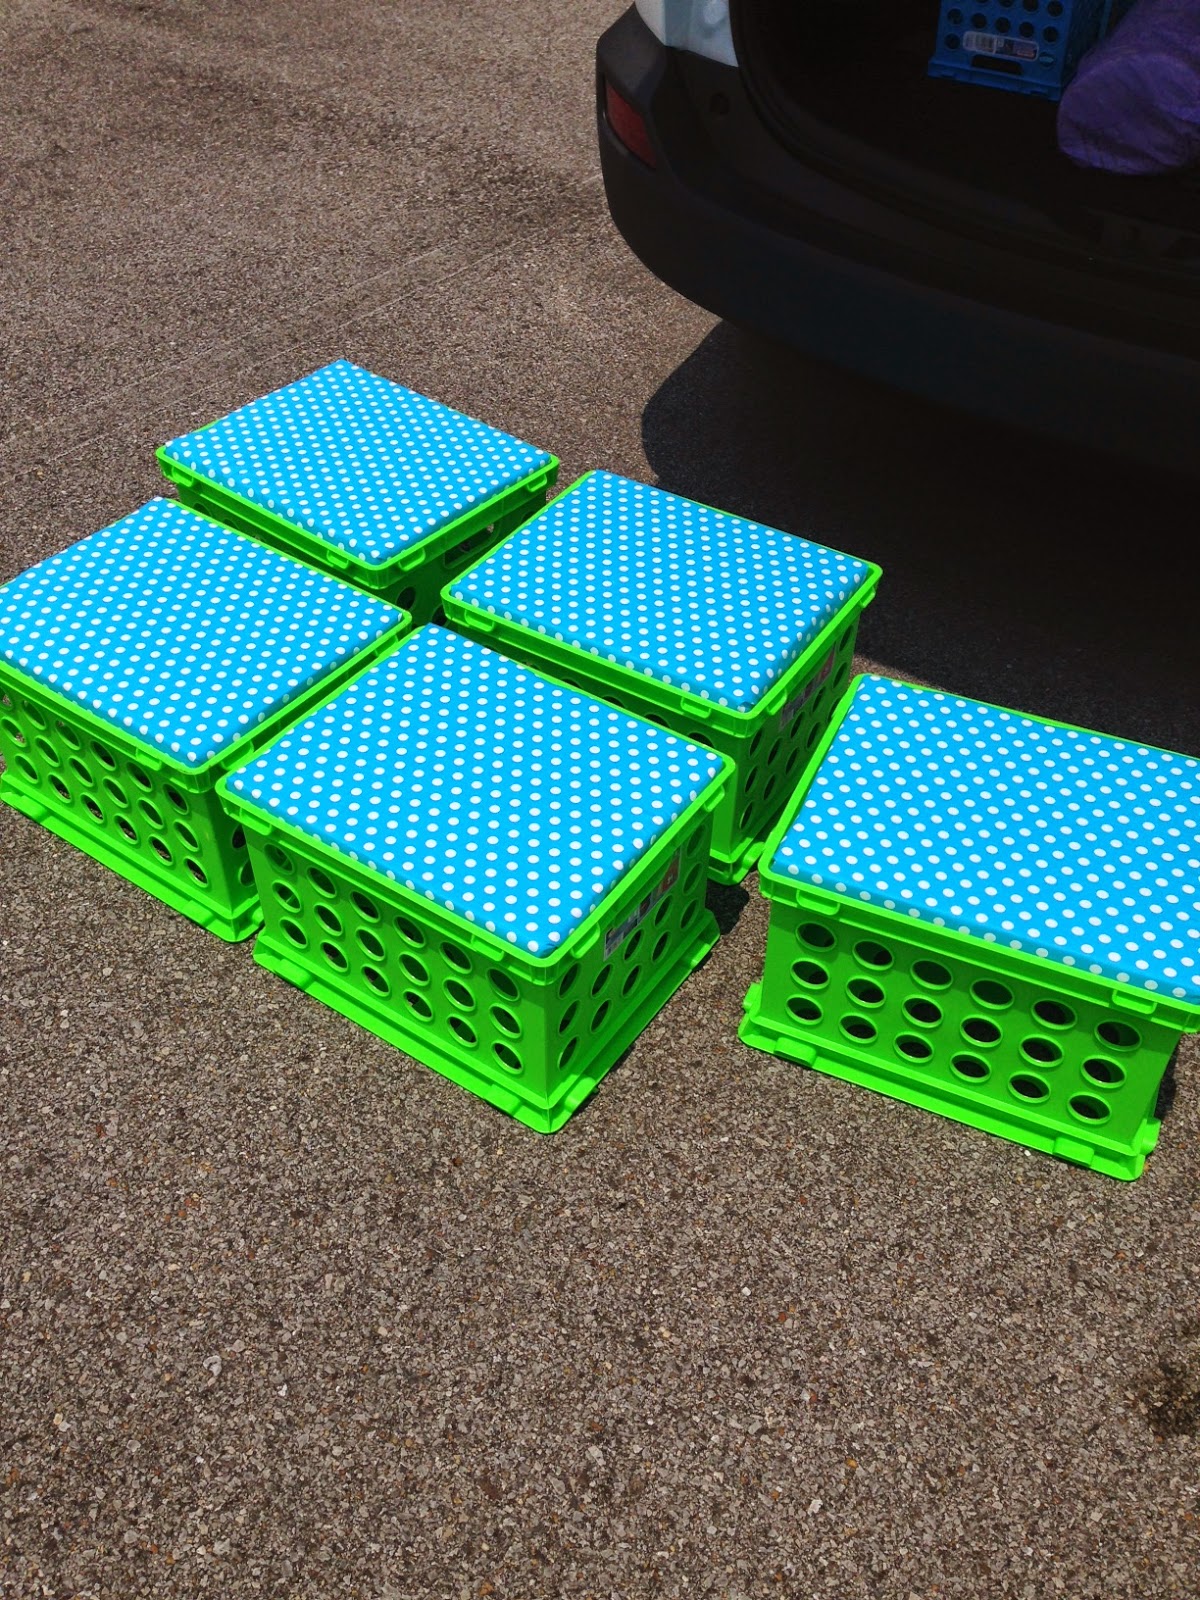
I decided to finally make some crate seats a while back. The area near my small group table was a little cramped with regular seats, so I decided crate seats would be the most efficient way to use the space- plus they are great for storage! The kids love sitting on them!

Here is the tutorial:
Before you begin the fun part, you need to do some shopping!! First, I bought my crates. Choose a color that suits your classroom color scheme. I went with bright green(my secondary color) because they didn't have turquoise. Then go to your local home improvement store, crate in hand, to have them cut plywood pieces to fit the top. If you are lucky like me, you will meet a nice man who's wife is a 3rd grade teacher who just completed this project the week before :).

Once the wood is cut, the fun begins! You get to pick out your fabric! I brought in a piece of the plywood with me to the fabric store, and I  explained to the ladies what I was doing with it. They were able to tell me exactly how much fabric I would need- since I am completely clueless when it comes to that sort of thing. Also while at the fabric store, I picked up some foam padding. This can be cut down to size.
***Ignore the liquid nails in the photograph and replace with spray adhesive.***


1. Lay your plywood on top of the foam padding. Trace the border of the plywood, and then cut. Spray the plywood with adhesive, and then place foam cushion on top. 

 2. Flip cushion over so that the foam cushion is laying on top of the back of the fabric. From here, you can estimate how large to cut the fabric. I simply just cut around the plywood, leave about 3 our 4 inches on each side.
 3. Here comes the tough part- pull the fabric very tightly with one hand, hold, then staple with your staple gun.
 4. Wrap your cushion like a present and staple as you go!
 5. Viola! You have a fun seating option for your kiddos AND some major storage for yourself!

What a space saver these little gems are! 

What you will need:
*crates
*plywood cut to size
*fabric
*foam padding
*spray adhesive
*marker (for tracing)
*scissors
*nail gun
Enjoy!!!

XOXO
Lauren


Monday, July 21, 2014

Classroom Pictures

These classroom pictures were taken last summer, right before school started. Enjoy!


A lot can happen in a year...

Hello out there! Well it has been about a year since the last time I posted something. Oops! The last time I posted, I had just landed my dream job as a kindergarten teacher at a Catholic school! I was gearing up to begin my first year teaching and plan a wedding!

Since then, I survived my first year and my wedding. Teaching was amazing, a blessing, and a dream come true! In April, I married the most wonderful man, Brian! It was beautiful- THE BEST DAY EVER!!!

My goal for this next school year is to blog regularly AND add products to my TpT! Click here to visit my TPT! I hope you enjoy my new blogging project and my store!